Do you struggle with publishing to your marketing channels on a regular basis?
Looking for a way to streamline the process?
In this article, you’ll discover how to use one content idea to produce video, audio, and blog posts that build a loyal and engaged fan base.

How to Repurpose Content for Your Blog and Beyond: A Plan for Creators by Colin Gray on Social Media Examiner.
Why Maintain a Blog, Podcast, and Video Channel?
An invested fan can only be built through reach, engagement, and attention: reach x engagement = popularity, and popularity x attention = trust. Here’s how maintaining a blog, podcast, and video channel can help you do that.
Build Reach via Blog Content
Reach is about being found; being visible. Your blog is perfect for this. Text search still has the widest reach, and it’s likely to stay that way for a long time. That means written content is the foundation of your reach.
Build Engagement via Video Content
Engagement comes next. Once people find you, you need to engage them enough that they’ll come back. At this point, you’re reaching lots of people and they’re starting to like you. But, as we all know, popularity is fragile. Written content can help you gain popularity, but it takes a good writer (perhaps a great one) to really engage someone and move them through printed words alone.
The easier option? Do what we humans do best: speak to people! This is where video comes in.
Video content is quick and easy to view, so guiding people to a YouTube video as a “next step” is relatively easy. Then they can meet the real you and see your personality, body language, and values; everything that makes you you. That breeds engagement.
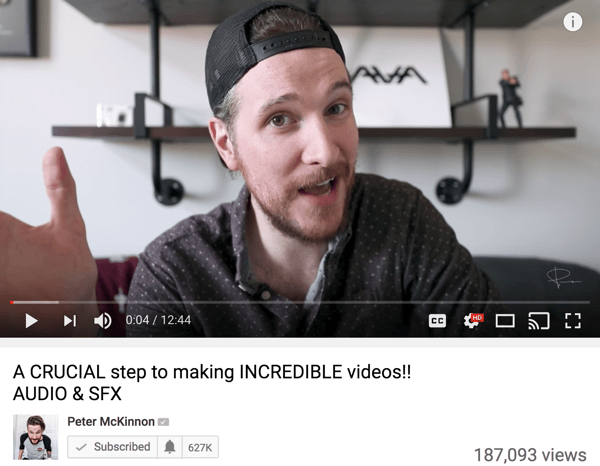
Video is a great way to introduce yourself to viewers and show them your personality.
Build Attention via Audio Content
Last comes attention. With video, you have to capture your audience’s attention in the first 8 seconds or they’re gone. And if you achieve that, the next milestone is just a few minutes.
Audio, on the other hand, is the master of attention. People might listen to a podcast riding in the car, mowing the lawn, working out, or cooking dinner. They’re doing something tedious at the time and they want to be entertained, educated, or inspired. That means you get hours of their attention at a time.
Look at two of the most popular shows on the Internet: Hardcore History and the Tim Ferriss show. Dan Carlin from Hardcore History attracts hundreds of thousands of listeners to a solo show about history. Yes, history. And Tim Ferriss generates millions of listens for episodes that often exceed 2 hours.
Popularity multiplied by attention equals the basis of all fandom: trust. Once someone really trusts you, they’re a true fan and will gleefully shout your name from the rooftops.
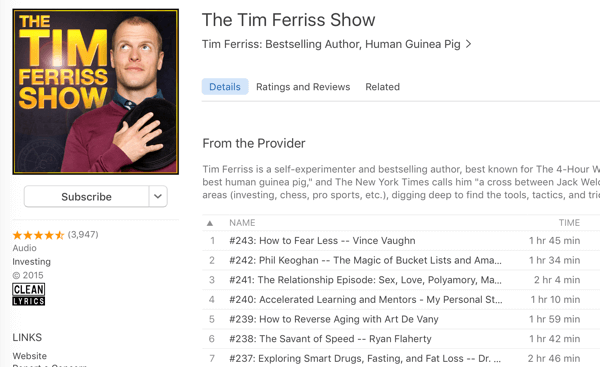
Podcasts can hold your audience’s attention for long periods of time.
How to Build a Content Stack for Your Blog, Podcast, and Video Channel
I can hear you asking, “How do I create all of this content?” You do it by thinking about content creation in a new way.
A lot of people just throw their content out there. For example, if you’re a fitness coach, you might write a blog post on Paleo diets, record a podcast on kettlebells, and film a video on how to stretch. You plan, create, edit, and publish each piece of content individually. While the content may be good, you’re not building on anything.
A better idea is to take your first content idea and build on it. Stop chucking and start stacking.
Craft a Plan for Your Content
It all starts with a content idea for a blog post, video, or podcast. Going back to the fitness coach example, you might plan a content idea around Paleo diets, and sketch out a bullet-point plan on the topic, like this:
- Overview
- Paleo principles
- Paleo recipes
- Common problems
- First steps in starting

Before you start creating your content, choose one content idea and sketch out a plan for covering it.
Next, for each main point, add three to five sub-points to flesh out the topic. Note that you don’t need to provide extensive details at this point.
Once you have your plan in place, record a video using the bullet points as a script. The bullets should provide enough detail to keep you on track but not sound as if you’re reading from a script. Treat your video like a radio show and sign off at the end of each section as if you were going to an ad break.
When your video is finished, divide the content into individual sections (one for each bullet point) and post them separately to YouTube. For the fitness example, the overview video stands alone as a great summary of the topic, the Paleo principles video introduces the theory, and so on. In the end, you’ll publish five short videos.
Next, take the audio from the complete video and publish it as a podcast of perhaps 20 or 30 minutes or longer. And finally, write a blog post based on the plan and publish it to your site.
Explore the Benefits of Stacking Content

You’ll save time by developing your blog, podcast, and video content in sequence.
Creating each type of media in sequence will save you significant time over creating the elements independently. You may be surprised how quick the writing process is when you have a solid plan to work from. The video recording should go like clockwork too, because you have a script in hand and you’ve refined your thoughts in writing.
The result is multiple content pieces based on one content idea, all created together. The content will be better, too, because you’re spending more time refining one concept.
Plus, you’ll develop invested fans by stacking every idea you come up with: the blog post for reach, the video for engagement, and the podcast for attention. First-time visitors will make their way through all three, and that’s where fans are born.
Now that you have an idea and a plan, here’s how to start creating the content for your blog, podcast, and video channels.
#1: Record Your Video and Audio
Some people prefer to record first and write later. The act of talking through a concept, explaining it to others through the mic, often leads to a clear, well-thought-out article. If you prefer, you can write first and record later. In a similar way, writing out the idea can refine it in your head and lead to a tight, actionable recording.
To record your video, you can use a digital SLR or a decent smartphone. Consider creating a video recording studio so your camera is always set up and ready to go.
If you don’t have a permanent space, just find a good corner of your house or your office. Putting your chair in front of a bookshelf works well, as does using a tidy kitchen as a backdrop (kitchens tend to provide interesting depth). Even better, position the chair facing a window so the light is good. If the lighting isn’t adequate, consider purchasing a softbox light.
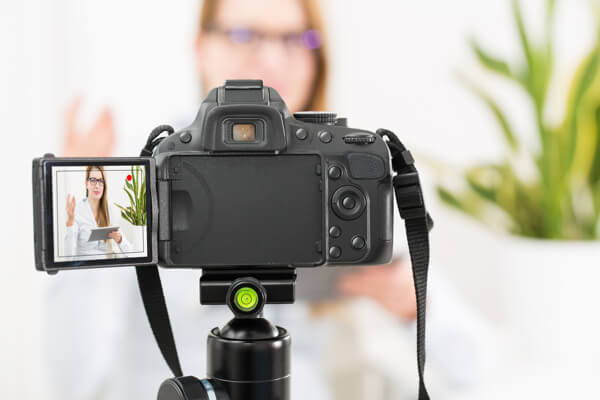
A digital SLR is a great choice for recording quality video.
The really important part is to record good sound. It’s worth the money to invest in a quality mic like the Shure SM58. A lavalier mic like the ATR3350iS (a bit noisy, but good value) can be a good option too. You can plug the ATR3350iS directly into a DSLR camera as long as it has an external microphone port.
If you’re using your smartphone, Rode has a great solution in the Rode smartLav+. It’s a lavalier mic that plugs directly into the phone and captures great sound. Rode also offers an extension cable and an adapter if you want to record two people.
#2: Edit Your Video and Audio
After you record your video, you’re ready to start the editing process. First, set up a production template in the video editing software of your choice. I have a blank template set up in Adobe Premiere, which saves me a lot of time. At $20 per month, Adobe Premiere allows a time-saving workflow that’s worth every penny. You can also use iMovie or Movie Maker.
My Premiere template has the music and video logos in it. Most importantly, they’re in roughly the right place to begin with.
I have seven Premiere sequences in total for every project. In Premiere, you create one sequence per video or audio episode, so I have five sequences for my five video segments, one for my podcast episode, and one for organizing and editing everything (the Full Episode sequence below):

I use seven sequences in Premiere to edit my podcast and video segments.
- Full Episode: Every video file from the main recording
- Audio Episode: All of the clips from the full episode, plus intro/outro music and transition effects
- First Video Segment (1-Story): The story segment of the show plus intro music, video graphic, show logo, host lower third, show notes upper third, and end screen (more on these below)
- Four Other Video Segments (2-Data, 3-Lesson, 4-Experiment, and 5-Actions): As above but including the relevant segment of the show
Next, let’s look at how each sequence template is set up.
Full Episode Template
This sequence is the first step and doesn’t include any default files. It’s the only sequence that isn’t intended to be exported to a final video. It’s simply for editing and organizing.
This is where I drag all of the episode recordings and edit them down to the final content. In most cases, I start with two or three raw recording files and split them up into the five segments, plus an intro and outro for the audio episode. I end up with seven clips on this sequence (as shown below), which are used to populate the other six template sequences.
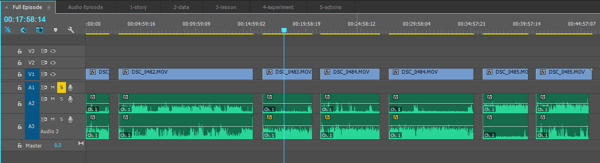
This is the full episode sequence, fully edited. It includes the five main video segments plus an intro and outro for the audio episode.
Audio Episode Template
The audio episode sequence is for… you guessed it, the podcast episode! In the template file for the audio, I include the intro music, outro music, and transition effects. There’s a transition clip that goes between each video segment as laid out below.
This template has two audio tracks, A1 and A2, and the music clips are included on A2.
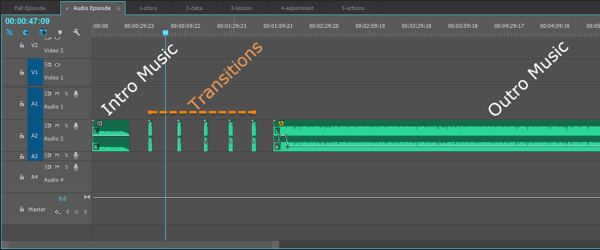
The default clips for every audio episode.
To create the audio episode, I copy the edited video clips from the Full Episode template into this sequence. I highlight V1 and A1 to make sure they appear on the right tracks, leaving the music intact on A2.
Then I shift the video files forward to 4 seconds and 10 frames, which lines up exactly where the music starts to fade out. (I’ve tested this and written it down in my editing checklist.)
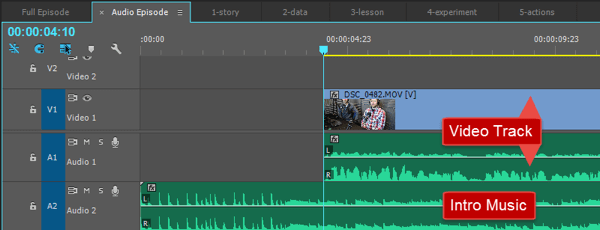
The video track is dragged along to 4 seconds and 10 frames, while the music plays on audio track 2 (A2) from the start.
Next, I drag the audio transition effect forward to line up with the end of segment 1 and then drag segment 2 back to line up with the end of that effect. So the transition effect plays between segments 1 and 2. Then it’s just a matter of copying and pasting the transition effect, and doing the same between the remaining segments.
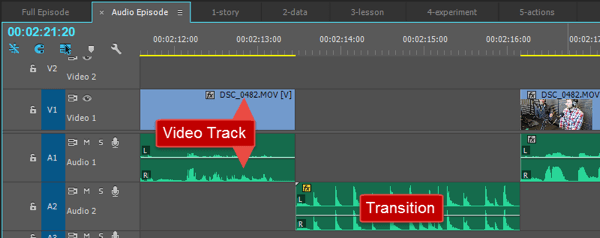
A transition effect placed between two show segments.
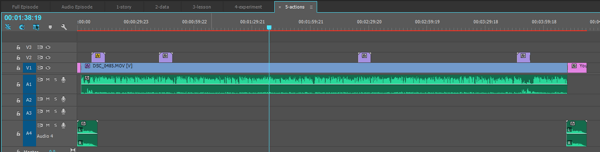
Finally, I line up the outro music with the end of segment 5 and drag it back on the timeline so it overlaps with the final segment by 1 second and 10 frames (again, tested, measured, and noted in the checklist).
If you look at the volume line (usually called the volume envelope) in the image below, you can see how the volume changes over time. It fades in over the first 1 second and 10 frames (during the overlap), plays at full volume for 2 seconds, and then fades out to around 25% volume for the rest of the outro.
This means the outro music plays in the background of the spoken outro for the show. Over the final 1 second of the speech, it fades up. Then it goes full volume for 2 seconds and fades out at the end.
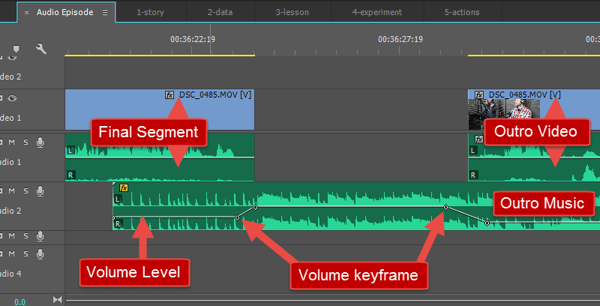
An image of how my outro music is laid out and how the volume changes over time.
The benefit of a template like this is that the volume shape is set up in advance so you don’t have to do it every time. The outro music is always sitting on the timeline, ready every time you start a new episode.
The only customization I have to do is to extend or cut the length of the outro music to match up with the length of the spoken outro. In Premiere, you can drag-select the volume keyframes and drag them to the right place in the outro music, as you can see in the video below:
.
Video Segment Templates
Now on to the video segments. All five templates are identical and look like the image below.
A view of the default video sequence template before adding video.
They include intro and outro music, just like the audio episode. I’ve edited both to the right length because they follow the same format in every video. These are in the blank template from the start on a second audio track. I leave the first audio track blank so the copied recording can populate it.
Let’s start with the audio elements. The intro music plays for around 4 seconds and then fades out. It’s designed to play over the video graphic, which plays for 2 seconds at the start. The music then overlaps with the start of the recorded video, fading out into the voice. It provides a nice quick bit of branding at the start, and transitions smoothly into the content itself.
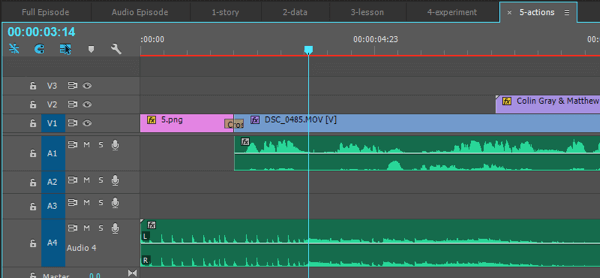
A view of a video segment intro, with the intro graphic (5.png) and the video recording (DSC_0485.mov) added in on V1/A1.
At the end of the sequence, the outro music is around 12 seconds long. The first 2 seconds of the outro fade up over the last 2 seconds of the video content, and then it plays over a 10-second end screen. I’ve edited this bit of outro music in advance so I don’t need to worry about volume keyframes or anything. It’s all ready from the get-go.
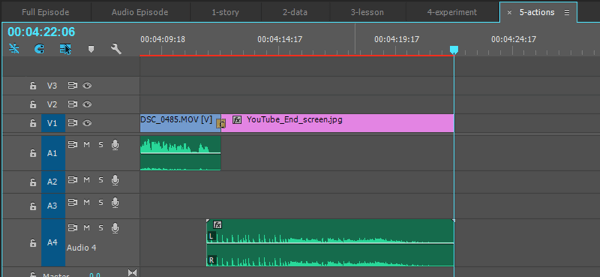
A view of the video segment outro with the end screen on track V1 and outro music on track A4.
Next, let’s look at the visual elements. In the blank template, the visual elements appear on a second video track. The copied-in video recordings appear on the first track, as shown below.
A view of the entire video sequence after adding the video recording and graphic.
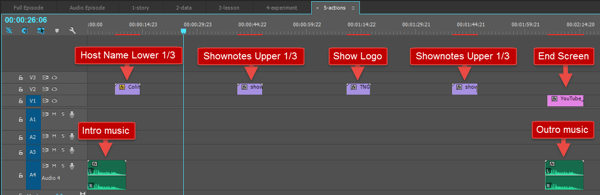
The first visual element I include is a host lower third, which introduces Matthew and me. This appears around 15 seconds into the video, as you can see in the example here.

The animated host name lower third appears in the bottom-left of the video.
Next I include a show logo for branding; it’s also a little visual hook that adds some interest. I add it in every 2 minutes or so. There’s one in the template so I can copy and paste it along the timeline to match the length of the video. You can see the moving version here.
The animated show logo appears in the bottom-right of the video image.
I also include a show notes upper third to direct people toward the show notes URL. It appears every 2 minutes or so too, alternating with the logo. So every minute, on average, viewers see a moving visual element on-screen, which adds a bit of dynamic interest.
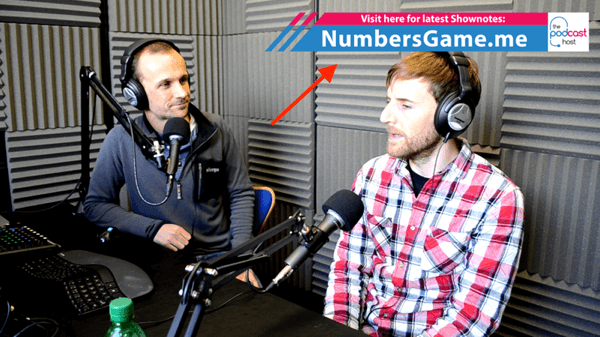
Our animated show notes upper third showing in the top-right of the video.
I line up a final show notes upper third about 30 seconds from the end of the video. This gives viewers a call to action in case they sense the video is coming to a close and click away before they see the end screen.
Speaking of which, the end screen is the final touch. It’s a still graphic on which you can overlay some of the standard YouTube end screen tools, such as “next video” and “channel subscribe.” It’s in the template by default, and I simply drag it to snap onto the end of the main video recording.

This is a simple video end screen.
I mentioned the outro music above. The final touch is snapping the end of the outro music to the end of the 10-second end screen. Because the outro music is 12 seconds long, and the outro screen is 10, the final 2-second outro-music/video recording overlaps by default. See how template planning makes life simple?
#3: Export and Publish Your Video and Audio Files
The final step is to export your media. Premiere lets you export the audio sequence as an MP3 file. I set the bit rate to 96 kbps and ensure it’s a mono file.
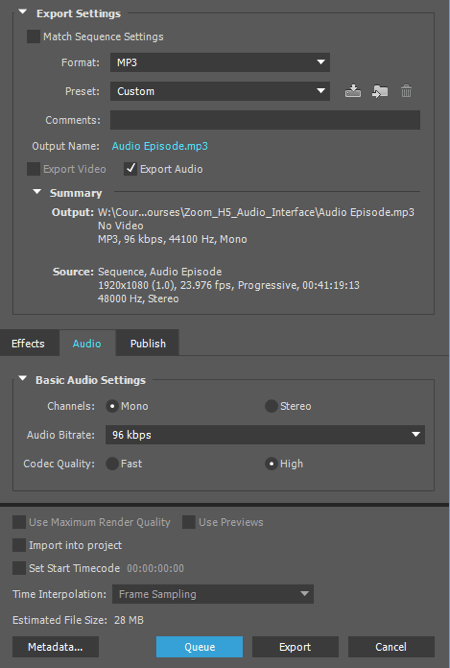
Export your audio as an MP3 file in Adobe Premiere.
I also use the Premiere loudness normalization to make sure the final file is -19LUFs, which is the noise standard for podcast files. You’ll find that setting in the Effects menu, as shown below.
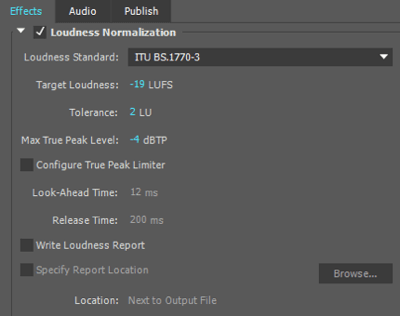
I use these loudness normalization settings when exporting my audio file in Adobe Premiere.
You can click the Save Preset icon (next to Preset: Custom in the image below) to save your settings as a preset for next time.
After selecting the export settings, click Queue (rather than Export) to queue it up in the Adobe Media Encoder. This is important because if you export right away, it’ll slow down your computer as you try to export all of the other sequences. Instead, I queue them all up in the encoder (the audio episode and the five videos) and then hit Start.
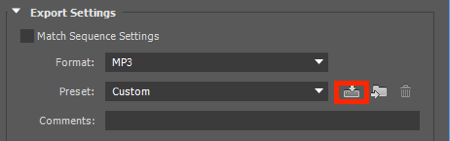
Save your Adobe Premiere export settings as a preset.
For the videos, I use the standard Vimeo 720p export settings with one addition: the -19LUFS loudness normalization. This setting ensures the videos are at the right export volume.
Now you’re ready to publish these media files to your podcast and video channels.
#4: Compose and Publish Your Blog Post
When you’re finished editing and exporting your audio and video files, use your bullet-point plan as a guide for writing your blog post. The writing process should be easier because you have an outline and the experience of talking through the episode.
You’ll also want to embed your audio and video inside the blog post. WordPress allows you to embed YouTube video really easily. And for the Audio, there’s a great tool called Powerpress that lets you integrate audio into your site to create a podcast. Here’s a guide to setting up Powerpress if you need it!
The blog post is your reach, the video builds popularity (encourage readers to click play on the video, as they’re browsing the post), and the podcast nurtures trust (include a player on the post and encourage them to subscribe!).
Conclusion
If you want to take content stacking to the next level, consider producing multi-episode “seasons.” Line up 10 or 15 episodes, all seamlessly linked together. When you’re finished, you’ll have a full guide on your topic, broken up into multiple episodes.
To generate momentum, habit, and change, there’s so much more power in themed and linked seasons than endless episodes that are random in level and topic. And an even bigger bonus? Seasons are perfect for larger repurposing. For example, you might:
- Turn a blog series into an ebook and use it as a lead magnet or sell it on Amazon.
- Turn a podcast series into an audio book and make it available as a free download or an Audible product.
- Package a video series into a course for Udemy.
So when you have your next content idea, break it down. Plan out a series of episodes rather than one alone, and you’ll see a whole heap of benefits.
–
This article first appeared in www.socialmediaexaminer.com
Seeking to build and grow your brand using the force of consumer insight, strategic foresight, creative disruption and technology prowess? Talk to us at +9714 3867728 or mail: info@groupisd.com or visit www.groupisd.com


